


I've recently had the opportunity to have a play with Azure Cognitive Services, so I figured I'd write about my experiences with it.
What are Azure Cognitive Services?
Azure Cognitive Services are cloud-based artificial intelligence (AI) services that help developers build cognitive intelligence into applications without having direct AI or data science skills or knowledge. They are available through REST APIs and client library SDKs in popular development languages. Azure Cognitive Services enables developers to easily add cognitive features into their applications with cognitive solutions that can see, hear, speak, and analyze. ―Azure
There are four services wrapped up within Cognitive Services:
Vision APIs - image processing, such as image recognition.
Speech APIs - speech-to-text, text-to-speech, speech translation.
Language APIs - text translation.
Decision APIs - anomaly detection, content moderation.
My focus today will be on the Speech APIs, specifically speech-to-text.
Project idea
Earlier today, I created a post on the Azure Projects subreddit, detailing an idea I had for a project, and it's that idea that I'm going to have a go at today.
Create a Dictaphone application, running in Azure!
Press a button and talk into a microphone, having Azure Cognitive Services transcribe the audio to text in real-time. Press a button to stop recording, then have the transcription saved to either a database or blob storage (for example) for later reference.
As an added (and extra fun) challenge, create a keyword recognition model so that saying a specific word (such as Pineapple!) automatically starts/stops the transcription.
I'm going to build this as a Python CLI application for this. I don't care much for front-end work, and it's been a while since I've written any Python - so this will suit me nicely.
Let's get started!
Software
I'm building this app locally for the time being, using the Azure CLI version 2.45.0, Python 3.11.1 and PIP 23.0. Both my Azure CLI code and Python scripts will be executed from a PowerShell window.
Deploying the resources
All I need here is a resource group and a Cognitive Services Speech instance. Below is the code I used to create them, including pulling the access keys from the Speech resource:
# login to Azure
az login

# Set the subscription where the resource will be created
az account set --subscription "<your-subscription-id>"

# Set the resource group name and location
$resource_group_name="<your-resource-group-name>"
$location="<your-location>"

# Create the resource group
az group create --name $resource_group_name --location $location

# Set the name of the Cognitive Services Speech resource
$speech_resource_name="<your-speech-name>"

# Create the Cognitive Services Speech resource
az cognitiveservices account create --name $speech_resource_name --resource-group $resource_group_name --kind SpeechServices --location $location --sku S0 --yes

# Pull the primary access key
$key=(az cognitiveservices account keys list --name $speech_resource_name --resource-group $resource_group_name | ConvertFrom-Json).key1
The above created a resource group and Cognitive Services Speech service on the free tier.
VNETS
Looking at the Azure CLI deployment options for the Speech resource, and upon further inspection in the Azure portal, I learnt that the Speech resource can have a Private Endpoint applied, and that there is a Service Endpoint available for Cognitive Services within a VNET. This means you can restrict networking access to only allow incoming traffic from the VNET. I had no idea this was possible for Cognitive Services. Good to know!
Quickstart:
The first thing I did was have a run through the Quickstart guide here.
To meet my software requirements, however (executing via a PowerShell session), I had to modify their sample slightly. The sample Python was looking for environment variables. As you can see from the below, I set these via PowerShell:
$env:SPEECH_KEY = $key
$env:SPEECH_REGION = $location
Below is the sample:
Note that I changed the speech_recognition_language from US to GB.
import os
import azure.cognitiveservices.speech as speechsdk

def recognize_from_microphone():
    # This example requires environment variables named "SPEECH_KEY" and "SPEECH_REGION"
    speech_config = speechsdk.SpeechConfig(subscription=os.environ.get('SPEECH_KEY'), region=os.environ.get('SPEECH_REGION'))
    speech_config.speech_recognition_language="en-GB"

    audio_config = speechsdk.audio.AudioConfig(use_default_microphone=True)
    speech_recognizer = speechsdk.SpeechRecognizer(speech_config=speech_config, audio_config=audio_config)

    print("Speak into your microphone.")
    speech_recognition_result = speech_recognizer.recognize_once_async().get()

    if speech_recognition_result.reason == speechsdk.ResultReason.RecognizedSpeech:
        print("Recognized: {}".format(speech_recognition_result.text))
    elif speech_recognition_result.reason == speechsdk.ResultReason.NoMatch:
        print("No speech could be recognized: {}".format(speech_recognition_result.no_match_details))
    elif speech_recognition_result.reason == speechsdk.ResultReason.Canceled:
        cancellation_details = speech_recognition_result.cancellation_details
        print("Speech Recognition canceled: {}".format(cancellation_details.reason))
        if cancellation_details.reason == speechsdk.CancellationReason.Error:
            print("Error details: {}".format(cancellation_details.error_details))
            print("Did you set the speech resource key and region values?")

recognize_from_microphone()
Within my PowerShell window, I run: clear; python .\recognize_from_microphone.py
I talk into my mic and my speech is converted into text in real time! Cool!

The transcription stops automatically after 15 seconds, or until silence is detected.
Continuous recognition
The above sample is great for getting started, but what I want is to record continuously until I tell it to stop. Having the API transcribe speech to text in real time is cool, but I also want to have that transcription saved to file.
In all honesty, this took I bit more doing that what I had anticipated. Initially, I followed the sample code from the Use continuous recognition section of the samples, which worked fine, but it really wasn't clear to me how to capture the live output to a variable so I could save it to file. Thankfully, a stackoverflow post came to my rescue. I also did some digging and found some more code in the Azure-Samples GitHub repo, which gave me a little more context.
Below is my Python script:
import os
import time
import azure.cognitiveservices.speech as speechsdk

def speech_recognize_continuous():
    # This example requires environment variables named "SPEECH_KEY" and "SPEECH_REGION"
    speech_config = speechsdk.SpeechConfig(subscription=os.environ.get('SPEECH_KEY'), region=os.environ.get('SPEECH_REGION'))
    speech_config.speech_recognition_language="en-GB"
    audio_config = speechsdk.audio.AudioConfig(use_default_microphone=True)
    speech_recognizer = speechsdk.SpeechRecognizer(speech_config=speech_config, audio_config=audio_config)

    done = False
    all_results = []

    def stop_cb(evt):
        print('CLOSING on {}'.format(evt))
        speech_recognizer.stop_continuous_recognition()
        nonlocal done
        done = True

    def handle_final_result(evt):
        all_results.append(evt.result.text)

    speech_recognizer.recognizing.connect(lambda evt: print('RECOGNIZING:{}'.format(evt)))
    speech_recognizer.recognized.connect(lambda evt: print('RECOGNIZED:{}'.format(evt)))
    speech_recognizer.recognized.connect(handle_final_result)
    speech_recognizer.session_started.connect(lambda evt: print('SESSION STARTED:{}'.format(evt)))
    speech_recognizer.session_stopped.connect(stop_cb)
    speech_recognizer.canceled.connect(stop_cb)

    speech_recognizer.start_continuous_recognition()
    while not done:
        print('type "stop" then enter when done')
        stop = input()
        if (stop.lower() == "stop"):
            print('Stopping async recognition.')
            print(all_results)
            with open("output.txt", "w") as txt_file:
                for line in all_results:
                    txt_file.write(line + "\n")
            break

speech_recognize_continuous()
Within my PowerShell window, I run: clear; python .\speech_recognize_continuous.py and started talking nonsense into the mic.
Note: you have to explicitly type the word stop into the window in order to stop the transcription. Such as the below:
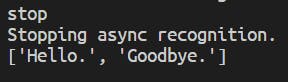
It worked though!

From here I can do something clever like name the output file according to a datetime stamp, and upload it to blob storage.
If I were making a pretty frontend for this application, I could tie the stop and start functionality to a button press.
For a bit of a laugh, I tried running my script against a Sea Shanty song called Wellerman, by Nathan Evans (Spotify). Nathan is a Scottish singer and the song certainly demonstrates a strong accent! This is what the script produced:

Compare that to the actual lyrics:
"There once was a ship that put to sea
And the name of that ship was the Billy o' Tea
Blow, me bully boys, blow (huh)"
Not a bad effort, really!
Keyword recognition
As an added bit of fun, I put in the project brief to add the ability to start and/or stop the speech-to-text transcription by mentioning a key work, such as Pineapple!
I honestly have no idea what I chose Pineapple...
There are two ways I can go about this. I can either be clever, or really clever!
My first clever idea is quite simple. Within my existing continuous recognition script, I could simply tell Python to stop the transcription if the string "pineapple" is found within the list of transcribed audio. Simple enough, but that should work.
The very clever way to go about this would be to create a custom keyword model within the Cognitive Services Speech Studio. I could create and download the model .table file, and reference that within the code, as per the speech_recognize_keyword_locally_from_microphone function within the GitHub Samples here, and by following the Quickstart page, here.
Sadly, I didn't get as far as completing the Python script for this due to time constraints, but when I get a chance to revisit this, I'll be sure to update this post. Equally, if you fancy having a crack as this yourself, feel free to use my code and downloaded model. See below for more info:
Code
You can find copies of all the code listed in this article within a public GitHub repo, here.